")
Last Updated on June 16, 2022 by Rose Morah
Gaia GPS is one of the best tools to use when you want to find great camping, off-road, hiking, and Overlanding trails.
It also offers you a ton of updated maps that can be downloaded onto your device.
To use Gaia GPS you can sign up for free or subscribe to their paid version to get more features.
If you have ever wondered how Gaia GPS work, this article is will cover how to use Gaia GPS.
- How to turn on Auto Sync
- How to create a route on Gaia
- How to create Waypoints on Gaia GPS
- How to load a route into Gaia GPS
- How to find camping spots on Gaia GPS
- How to find motor vehicle use trails (MVUM) on Gaia GPS
- How to download your trails on Gaia GPS
- How to record and take pictures of your tracks on Gaia GPS
How to turn on Auto Sync
If you are using Gia on different devices, make sure that you turn on the Sync/Backup at the app’s settings so that whatever you are doing can be saved on all other devices.
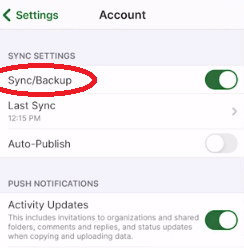
How to turn on the Sync/Backup option:
- Go to the app’s settings.
- Tap on “Account”.
- Turn on the Sync/Backup option as seen in the image below.
How to create a route on Gaia
I normally find it easier to create a route on Gaia on your computer than on your phone or tablet.
To create a route you only need to click on the “Route” icon, select your routing mode, then click on the map to mark the starting point and add points along the route.
Remember to set your routing mode correctly when creating the route.
You have four routing mode options:
- Hiking.
- Cycling.
- Driving.
- Straight Line.
Related: Pros and Cons of onX Maps, Trails Offroad VS. Gaia GPS.
How to create Waypoints on Gaia GPS
You can click on the points that you have marked on the map to create a Waypoint.
Alternatively, follow the steps below to create a waypoint on the computer:
- Under create, on the Homepage, click on Waypoints (after signing in).
- A dialog box will appear. Name the Waypoint.
- A location indicator will then appear on the map.
- Drag and drop it to where your Waypoint is located.
- You can then change the indicator icon to an icon that resembles the activity that you will be doing at that location.
How to load a route into Gaia GPS
First, you need to download an online GPX file of the route to import it to Gaia.
The GPX files are trucks/waypoints that others who have been on the route have saved online for use by other people.
These files usually have very helpful waypoints.
Where can you find these files?
You can get them on Overlanding or off-road forums, communities, and some apps and websites such as off-roadtrails.com.
NOTE: Gaia not only supports the GPX file but also other files such as KML, KMZ, FIT, and GEOJSON.
The following are the steps for uploading those files to Gaia:
- On the homepage, tap on “Import Data”.
- A dialog box will appear prompting you to choose the file to be uploaded.
- Once it is uploaded, it will appear on your navigation map.
- To view the tracks clearly, you can clean them up by clicking on the “Overlays” option and turning off the “Waypoints”.
You may also like:
9 Most Important Overlanding Tips and Tricks (A Beginners Guide).
How to Find Overlanding Trails (Best Tools & Resources for Finding Trails).
How to Start Overlanding on A Budget (Overlanding Tips for Beginners).
How to find camping spots on Gaia GPS
To find a good camping site, you will need to find public lands on your route. A good example of these lands is BLM, National Forest Land, and so on.
Be sure to read their camping regulations first before you go camping.
The following are steps to find the public lands to camp on Gaia:
- Tap on “Layers”.
- Turn on the Public Land layer by clicking on it.
- The map will change and will have different colors indicating the public lands on that route.
| Green – represents the National Forrest land. Reddish – represents the National Park. Yellow – represents BLM. |
Note: When you are just getting started with the Gaia app, the layers options will be few.
You can always click on “Add Map Layers” to find the type of map you want to add to your layers.
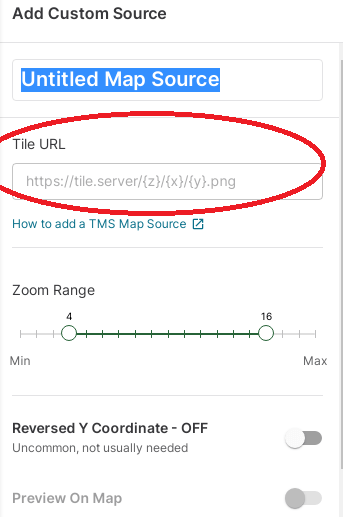
Additionally, if you would like to add a map, you can add it by just scrolling down to “Add Custom Source” at the bottom after clicking on the “Add Map Layers” (see the image below).

You will need to have the URL of the custom map that you want to add as seen in the image below.
See also:
Pros and Cons of Hardshell Rooftop Tent (Buyers Guide).
15 Best Portable Showers for Camping.
How to find motor vehicle use trails (MVUM) on Gaia GPS
- Go to “Layers”.
- Turn on the MVUM layer by clicking on it.
- The map will display the trails that you can travel on.
How to download your trails on Gaia GPS
Downloading the areas that you will be touring on your device allows you to use it offline in case the area has no service/signal.
Here’s how to download your trails from Gaia;
- Go to “layers”.
- Make sure all the maps that you are going to be using are turned on (Active).
- Click on the + sign on your menu option and head on to download maps.
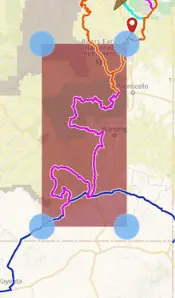
- A square-shaped pop-up is going to automatically appear on your map.
- Adjust the square corners to touch the areas that you will be touring. (See the image below).
- Then tap on the “Save” button.
- Once it is saved, you will be able to see the saved areas. You can use the other square that pops up to adjust the corners of the area that was not saved.
How to record and take pictures of your tracks on Gaia GPS
The Gaia app allows users to record their tracks.
To do that you only need to:
- Tap on the + sign on the menu options.
- Then tap on “record a track”.
You can click the picture icon when recording to take a picture.
In conclusion, there’s a lot to learn about the Gaia GPS. The article has only scratched the surface to help you figure out things fast when using it for the first time.


